Homemade Salted Caramel Ice Cream: A Masterclass in Rich, Creamy & Praline Perfection
There's something undeniably magical about salted caramel. It’s that exquisite dance between sweet and savory, a buttery richness cut by a delicate hint of salt, transforming any dessert it touches into pure gold. From luxurious sauces to decadent brownies, salted caramel has proven its universal appeal. But perhaps nowhere does its charm shine brighter than in a perfectly crafted
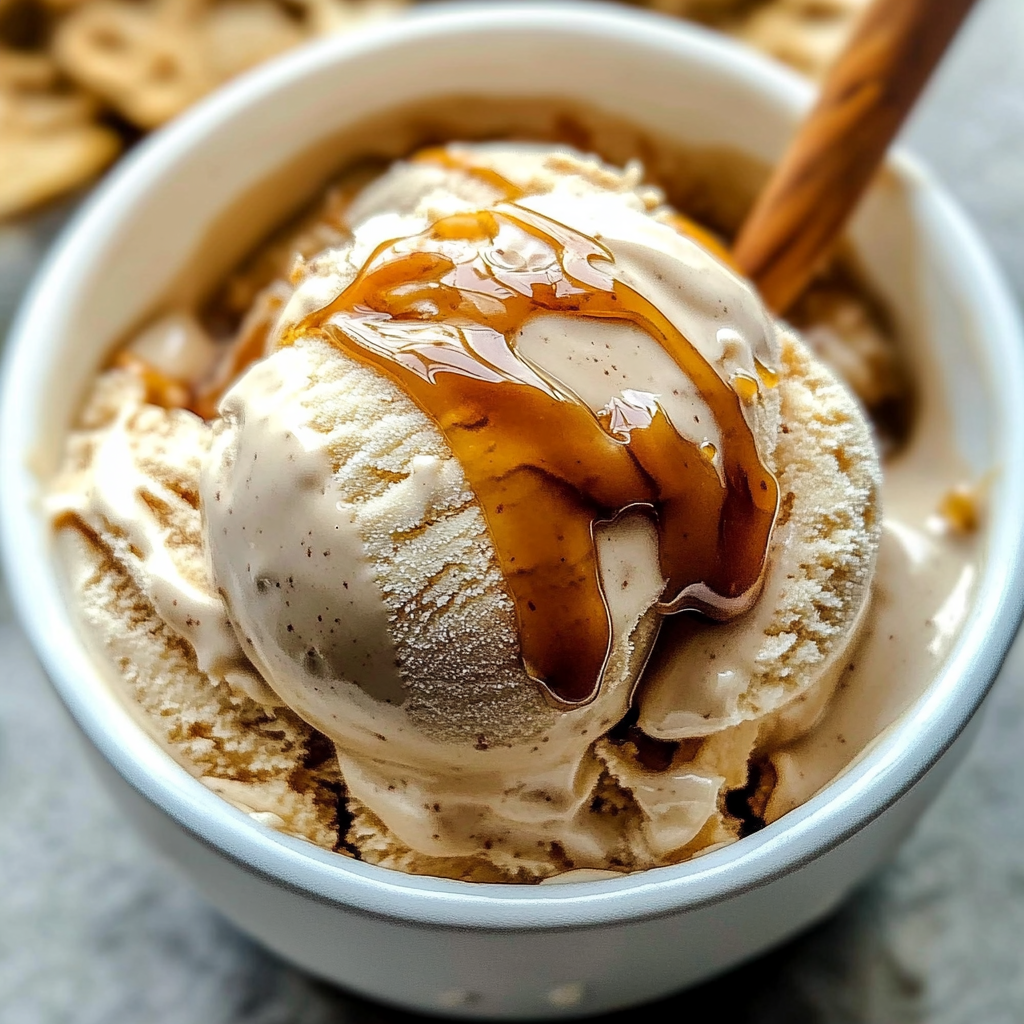
salted caramel ice cream recipe, especially one graced with delightful, gooey bits of praline. If you've ever dreamt of scooping into a homemade treat that rivals the finest artisanal gelato, this comprehensive guide to crafting a rich, creamy, and praline-perfect salted caramel ice cream is for you.
The Irresistible Allure of Salted Caramel
The love affair with salted caramel isn't just a trend; it's a testament to a perfectly balanced flavor profile. It takes the familiar comfort of caramel – that smooth, melt-in-your-mouth sweetness – and elevates it with a whisper of salt. This contrast isn't just surprising; it's transformative, enhancing the caramel's depth, making it taste richer, more complex, and utterly addictive. This isn't just about adding salt; it's about finding that sweet spot where the flavors amplify each other, creating an almost nutty, profoundly satisfying experience that begs for another spoonful.
Many home cooks find themselves adding salted caramel to their "to-make" list, often inspired by an unforgettable scoop enjoyed on vacation. The desire to recreate that luxurious experience at home becomes an exciting culinary quest. And while the idea of making caramel from scratch might seem daunting, the truth is, with a little patience and the right technique, you'll discover it's a deeply rewarding process, leading to an ice cream so good you'll be tempted to stash it away and not share a single spoonful.
Mastering the Caramel Base: A Culinary Adventure
The heart of any exceptional salted caramel ice cream lies in its caramel base. While stories of caramel-making mishaps might circulate, rest assured, creating this essential component is more about attentiveness than innate skill. It's a culinary adventure that yields incredible rewards.
First, let's demystify the process. Caramel is essentially melted and cooked sugar. The key is to control the heat and monitor the color. You'll start by melting granulated sugar with a small amount of water in a medium pot over medium heat, swirling occasionally. The sugar will first melt, then bubble, and finally, begin to change color. Patience is paramount here; resist the urge to stir with a spoon, as this can cause crystallization.
Your goal is a beautiful mahogany brown – deep amber, almost but not quite black. This deep color indicates a rich, complex flavor. A crucial tip for first-timers: have a little extra sugar on hand. If your first batch burns (a very dark, acrid smell and taste), don't despair! It happens, and a fresh start is easy. The moment your caramel reaches that perfect shade, remove it from the heat just before you think you need to. This preemptive move helps prevent burning, as the residual heat will continue to cook it for a few moments.
Once the sugar is caramelized, carefully add the heavy cream, whole milk, remaining sugar, and a pinch of fine sea salt to the pot. The hot caramel will likely seize up and harden when the cooler dairy is added – this is completely normal! Simply return the pot to medium-low heat and simmer gently, stirring constantly, until the hardened caramel completely melts into the cream mixture and it becomes perfectly smooth. This fragrant, buttery caramel sauce is so incredibly delicious, you might be tempted to stop right here and eat it by the spoonful – and honestly, who could blame you?
Crafting Your Custard: The Secret to Silky Smoothness
The next step in achieving truly spectacular salted caramel ice cream is developing a rich, silky custard base. This is what gives homemade ice cream its luxurious texture and prevents it from becoming icy. Our recipe calls for a custard base, which, while requiring a few egg yolks, is well worth the minor fuss for the thick, velvety results.
You’ll need about six large egg yolks for this recipe. In a separate bowl, whisk these yolks until light and creamy. The magic happens next with a process called tempering. While whisking constantly, slowly pour about a third of the hot caramel-cream mixture into your egg yolks. This gently warms the yolks, preventing them from scrambling when they meet the rest of the hot liquid. Once tempered, whisk the yolk mixture back into the pot with the remaining caramel-cream base.
Return the pot to medium-low heat and gently cook the custard, stirring continuously, until it thickens enough to coat the back of a spoon. This typically happens around 170 degrees Fahrenheit (77 degrees Celsius) on an instant-read thermometer. Do not let it boil, as this can curdle the eggs. Immediately strain the custard through a fine-mesh sieve into a clean bowl. This step is crucial for removing any small bits of cooked egg or undissolved caramel, ensuring a perfectly smooth and silky base. For a deeper dive into the science behind this silky custard base and achieving the perfect sweet-salty balance, you might enjoy our article on
Silky Custard Salted Caramel Ice Cream: Perfect Sweet & Salty Balance.
Allow the mixture to cool to room temperature, then cover it and chill in the refrigerator for at least 4 hours, or preferably overnight. Proper chilling is vital, as a thoroughly cold base will churn into a much creamier ice cream. If you're looking to achieve a slightly lighter texture, you can adjust the dairy ratio by using more milk and less heavy cream, as long as the total dairy volume remains consistent. However, for that truly decadent experience, a higher cream content is recommended.
Churning & Perfecting Your Homemade Treat
With your perfectly chilled custard base ready, it’s time for the exciting final stage: churning! Follow your ice cream machine manufacturer’s instructions for optimal results. Whether you have a compressor model or one with a freezer bowl, the process typically involves pouring the chilled base into the machine and letting it churn until it reaches the consistency of soft-serve ice cream. This can take anywhere from 20 to 40 minutes, depending on your machine.
During the last few minutes of churning, or just before transferring to a storage container, it's the ideal moment to introduce the flaky sea salt. A quarter teaspoon of flaky sea salt, such as Maldon, sprinkled into the base during this stage, provides little bursts of salty crunch that contrast beautifully with the sweet caramel. This simple addition elevates the flavor and texture significantly.
Once churned, transfer your homemade salted caramel ice cream to an airtight container and freeze for at least 4-6 hours to allow it to firm up to a scoopable consistency. This recipe typically yields about 1½ pints of this exquisite dessert. For a more comprehensive guide to perfecting every aspect of your homemade salted caramel ice cream, from ingredient selection to troubleshooting, consider reading
Your Guide to Indulgent Salted Caramel Ice Cream Perfection.
Elevating Your Experience: Praline Perfection & Pairings
While the salted caramel base is magnificent on its own, the addition of praline takes this ice cream from simply delicious to truly unforgettable. Imagine rich, buttery, salty caramel ice cream with little bits of caramelized nuts, adding a delightful crunch and an extra layer of gooey sweetness. Praline is essentially nuts (often pecans or almonds) coated in caramelized sugar, and while you can buy it, making a simple batch by caramelizing chopped nuts with sugar is incredibly rewarding. Once cooled and crushed, these tiny bits of praline can be folded into the ice cream after churning, just before the final freeze. They’ll turn wonderfully chewy and gooey in the cold ice cream, offering a textural dream.
To further enhance the richness of your ice cream, consider splurging on high-quality ingredients. Using fancy European butter in your caramel, for instance, can impart an even deeper, more complex flavor profile. The subtle differences in dairy fat content and flavor become noticeable in a recipe where butter plays such a starring role.
This indulgent salted caramel ice cream is fantastic on its own, but it also deserves a partner in crime. A warm, fudgy brownie is an absolutely perfect pairing, creating a classic combination that’s hard to beat. Other delightful accompaniments include a scoop alongside a slice of apple pie, drizzled with extra caramel sauce, or served simply with a sprinkle of roasted pecans. The possibilities are endless, and each pairing only highlights the versatility and sheer deliciousness of this homemade masterpiece.
Conclusion
Embarking on the journey to create homemade salted caramel ice cream is a culinary adventure that promises immense satisfaction. From the delicate art of caramelization to the precise science of a silky custard, each step contributes to a final product that is rich, incredibly creamy, perfectly balanced in its sweet and salty notes, and elevated by the delightful surprise of praline. This isn't just an ice cream recipe; it's an experience in crafting pure indulgence. So gather your ingredients, take a deep breath, and prepare to be amazed by the best homemade salted caramel ice cream you've ever tasted. It's a treat truly worth every bit of effort.